Category Archives: #forensics - Page 2

ADS Links

I’ve been doing a lot of research into encrypting data into alternate data streams (what, I was bored one night!). Instead of boring you with more of the same (this topic has been covered extensively by others), I’d like to share some links with you.

One of the best sources I’ve read regarding ADS is Harlan Carvey’s Windows Forensic Analysis 2E. It was my first real exposure to the wonderful world of alternate data streams and file/folder/executable piggy-backing. (Rob Lee mentioned alternate data streams in SANS FOR408, which piqued my interest.)

The Gabro Blog entry on ADS is extremely insightful as well. Although it does say how the ADS has different encryption attributes than the parent. That’s somewhat misleading as you can’t actually EFS-encrypt an ADS at all (trust me, I’ve tried via cipher /E /A and it isn’t… nor does it make too much sense logically). Of course you can encrypt content with something like GPG and then “push” the content into something else with type.

Additional Resources

Quinn Shamblin’s “Alternate Data Streams Overview” (SANS Blog)
Harlan Carvey’s Blog entry on ADS entitled, “NTFS Alternate Data Streams

Mandiant APT1 Report & New IOCs

I’m a little late writing about this but, as many people now know, U.S. security and forensics firm Mandiant has released critical information in regards to the Chinese state sponsored group known as APT1. As a student of digital forensics I find this kind of stuff very interesting. I’ve been having some great discussions on various forums with fellow (usually more experienced) security buffs in the field with regard to the 60-page report so I thought I’d reshare the links.

APT1: Exposing One of China’s Cyber Espionage Units (Mandiant Intelligence Center)

IOCs w/ hashes as part of Mandiant’s OpenIOC ProjectDigital Appendix & Indicators

So be sure to add those IOCs to a Redline collector and get scanning!

Google Map Tiles: Forensics & IEF

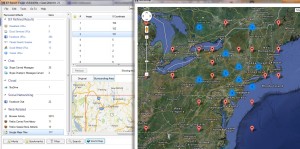
I stumbled upon something neat I thought I’d share with you all while playing around with a demo of Internet Evidence Finder by Magnet Forensics. It is essentially using a memory image to determine where an individual may have been based on his/her geolocation queries, crowd sourced GPS check-ins (using Google Maps), etc. by analyzing Google Map tiles.  Obviously, although IEF is known in the forensics community, I was impressed when using it for the first time.

I allowed IEF to carve web browser artifacts, chat sessions and Google map tile artifacts from a memory image (acquired via FTKi). Then had IEF map the coordinates from the tile file names and plot them across a world map (it is as simple as hitting “World Map” in the Report Viewer). You can also use Magnet’s free standalone GMTI (Google Maps Tile Investigator) to plot specified coordinates if you’ve pulled the artifacts using another method.

Although this is a known feature of the software, I found it incredibly impressive very useful. That you can do this directly from a memory image –  with the same amount of success as from a hard drive image – is pretty cool.

Using that information you can get a general sense of where an individual was by what map information he or she searched for using Google Maps.

memorytriangulation

You can begin to develop a hypothesis as to the location’s significance when you compare this information to other known facts within your investigation. Knowing this information can help you weigh the importance of a cluster of plots and determine whether they are significant.

Instructions and more information on Google Map tile forensics is available in a great post by Magnet on their blog: http://www.magnetforensics.com/investigating-google-maps-how-the-tiles-tell-all/

For more information on Magnet’s IEF see: http://www.magnetforensics.com/products/internet-evidence-finder/

Information on the standalone (free) GMTI can be found at this address: http://www.magnetforensics.com/google-maps-tile-investigator/

In NTFS Secure Erase Leaves Remains

I was wondering as to whether or not drive wiping tools in Windows actually performed as expected by wiping all previously securely deleted content from a mechanical hard drive’s unallocated space. I was also curious as to know what information could be gleaned from a wiped drive as to the files that were wiped and if such a find was worthwhile. My tool of choice for the exercise was CCleaner’s free space wiper.

For those that don’t know, wiping is essentially instructing a program to flip bits so that the data’s pattern is permanently unrecoverable. 1 would become a 0 and a 0 would become a 1. Ideally one good pass is all that’s needed to perform this operation but rarely does so efficiently. The DoD is known for using a 7 pass method in order to be safe, erring on the side of caution. Relying on statistics, pioneer of the Gutmann Method, Peter Gutmann, opted for a 35 pass wipe which is widely regarded as over kill. Which method is best? There’s no way to be certain. Different erase tools perform differently and some secure erase programs fail to “scramble” data in the appropriate fashion.

For my desires to wipe the data from the hard drive I decided on being cautious but not outright paranoid (most of the files I deleted to do this exercise were junk anyhow). I opted for the standard 7 pass method. Regardless of what type of pattern wipe you choose – or what wiping program you use – the results below will be the same.

I found that while alternate data streams and unallocated space on the drive were essentially wiped clean, file names were recoverable in the $I30 allocation index in sub-folders on the drive. How was this possible if the $MFT also didn’t indicate that data?

I’m relatively new to forensics and didn’t have a clue at first but with proper research I figured it out. All credit belongs to those that came before me. A blog post that explained it was entitled, “NTFS $I30 Index Attributes: Evidence of Deleted and Overwritten Files” by Chad Tilbury, a SANS Institute Instructor.

If you’re interested in learning more please check out that post. Essentially I learned that that in forensics we can find wiped content by viewing the NTFS Index Allocation File, $I30, still located in NTFS allocated space (FYI, I triaged the drive by examining it in FTKi). (Also if the file was ever EFS encrypted, an $EFS file may also be present in the folder in which it resided. One of the many reasons using the cipher command warns the user to encrypt an entire folder instead of contents within a folder.)

While I was unable to actually recover the files, I was able to glean the names of the files that I previously erased. Knowing that the index was in a particular sub-folder would also show a forensic investigator where the data was actually stored. But what is even more interesting is that Tilbury’s article states that MAC times can also be gleaned from an $I30. Plus, knowing file types or securely erased data may lend a hand to advanced data carving. Very cool. It truly makes the index a trove of useful information in an investigation.

As a student currently enrolled in forensics classes, my goal was to see if secure erasing completely removed “all traces” of said evidence on a Windows system. I was shocked to learn that it does not (yeah, I’m a “noob” with some things – this information has been out for a while – but I’m not afraid to admit that I’m learning). But for more in-depth information on parsing through the index or extracting more information from the file system please see the links below.

Apparently there are lots of remains left behind that indicate a drive has been wiped (the launching of the executable itself, obviously, but also of the content). If your interested in the topic I highly recommend researching it more thoroughly.

Obviously there are ways of getting rid of a data in a more effective manner. Wiping the entire disk from outside of Windows is preferable though manufacturer-style wipes are always the best. After my recent class I’ve been toying around with hdparm against SATA drives that accept the SE commands and found this method to be best. Of course you could use dc3dd/dcfldd’s pattern filling function as well.

File Wiping/Free Space Wiping Methods Used

Files securely erased with Eraser using 7 pass wipe and then performed a Free Space Wipe on the same drive in CCleaner (7 pass).

Sources

Tilbury, Chad. “NTFS $I30 Index Attributes: Evidence of Deleted and Overwritten Files.” SANS Blog. September 20, 2011.

Read about the blog post first on the Wilder Security Forums after doing a Google search for $I30.

Links- Ophcrack for Windows Password Extraction

With forensics in mind, there’s literally a ton of ways to gain access to Windows. From clear text password exploits that dump the password in plaintext to your screen to bootable CDs that reset the Windows password outright (just search Google for “Windows Password Recovery” to see what I mean). This post isn’t meant to cover all password recovery bases, just briefly explain why reset tools may not be forensically sound and provide some links that may be of value to you if you need a good tool (my current favorite method is utilizing tool known as Ophcrack).

For those that don’t know, 0phcrack is a free but powerful utility that makes use of rainbow tables to crack NT HASH and LM passwords. It utilizes a method known as Time-Memory Tradeoff (discussed earlier on the blog). The best tables that support different types of characters for use in password extraction (and for different OS types) can be rather large. Cracking passwords can also be time consuming.

Distributions like the now-defunct free version of e-fense’s Helix 3 (no longer supported in favor of a paid pro version), and DEFT Linux, made/makes use of 0phcrack and provided access to basic rainbow tables for this purpose. If you don’t have Helix or 0phcrack as part of your forensic tool-set, you should. If you are interested in expanding your tables and have access to a large enough medium, feel free to check FreeRainBowTables.com to get more tables generated using distributed computing methods). The basic tables can also be found on 0phcrack’s Sourceforge and are suitable for basic use, but they also have paid tables as well.

0phcrack can be used during the analysis of a target’s SAM and SYSTEM Hivehive. It can be run as an executable from within Windows or in a bootable environment. Such information could provide forensically invaluable in accessing EFS-protected files on the system. From what I know, using methods like chntpw in Backtrack do reset Windows passwords but do then make accessing EFS encrypted files impossible.

Check this video created and posted by TechnologyCrazy to see how to setup 0phcrack (completely unaffiliated with this site).

As I always state, this site does not condone illegal activity. Link posts are links to pre-existing content (I’m actually considering making my own informational videos at some point when I have the time. Maybe even a step-by-step guide).

For links to computer security related tools or resources, feel free to check this Neuralhub post.

If you have access to any related instructional video please post it in the comments! If they are any good (and they are publicly accessible), I’ll share them.

Edit: This post is fairly old and I’ve used some really great programs since then. Here are some further notes to help you decide which encryption auditing tool you should use and when:

Ophcrack Project Homepage

This tool is good for LM and NT hash; quick and easy SAM hive cracking which is ideal if you don’t happen to have a license for PRTK but do for FTK and wish to crack EFS; uses rainbow tables for speed (pre-calculated hashes), for brute force see l0phtcrack below.

l0phtcrack Password Auditor

Offers excellent brute force, support for rainbow tables and dictionary attacks. Some that are coming from PRTK may note l0phtcrack seems to be missing PRTK’s biographical dictionary attack… one of my favorite tools. But that’s not necessarily true: you can accomplish this by loading biographical information in by creating your own dictionaries. Also one of the coolest features of l0phtcrack is the network sniffer which pulls password hashes transmitted across a network… but fair warning: it doesn’t always work, if in doubt, read the documentation).

** Note: thanks to my nameless friend for letting me try his l0phtcrack. Much appreciated.

AccessData’s PRTK

One of my all time favorite tools. Although brute forcing and standard dictionary attacks may take a long time and be resource intensive, PRTK also includes some pretty powerful dictionaries straight off the bat. Also nothing beats the simple and straight forward interface. I’m a huge fan of the biographical dictionary attack in which you can import string data from FTK and FTKi to accomplish a user-specific attack (that is to say, things like directory listings, FTK dtIndex’d results, etc. can all be imported to speed up attacks).  I used PRTK extensively in my AccessData Certified Examiner studies and found it to be one of the best tools to date.

Interesting side note regarding EFS cracking if you have a license to FTK but not to PRTK:

If you are running FTK4+, you can first crack the Windows user password in Ophcrack (SAM & SYSTEM hives) and then, after selecting the EFS encrypted file, allow FTK to decrypt it with the password you’ve discovered. FTK also includes allows you to list multiple passwords if you’re unsure of which it may be. If PRTK is installed on the same system, it’ll use PRTK in the background and decrypt the file. Of course, as an ACE, I advocate getting a license to PRTK if you can, but thankfully PRTK can be used for this at the back-end with little trouble.

Link/Article – Memory Forensics & Encrypted Data Extraction

I’d like to post a link to a very neat paper I found which discusses the ability analyze RAM in hopes of targeting encrypted drives, volumes, files or folders (cited below). A forensic investigator can recover encryption keys and even acquire passphrases with no hash cracking needed. Once a key and/or passphrase is obtained, any encrypted medium on the hard drive using the same credentials may be compromised.

Brian Kaplan’s RAM is Key – Extracting Disk Encryption Keys From Volatile Memory, Carnegie Mellon University (May 2007).

The paper is somewhat dated as it was released in 2007. But what’s cool about it is that such analysis wasn’t as common then as it is now (live acquisition was frowned upon). While it doesn’t highlight anything new (and, indeed, shows its age at times), the paper does make for some interesting reading.

While I’m still relatively new to forensics and currently studying DFIR, I figured that this paper may be of interest to some (I found it interesting from a historical aspect). Plus this article is a good way of introducing more forensic posts to the blog.

Feel free to share similar (or more timely) articles using the comments field below!

Related Tools

Volatility by Volatile Systems

Memoryze/AuditViewer & Redline by Mandiant

Finding Encrypted Drives/Volumes on Hard Drive

EDD and, I hear, TCHunt are both excellent tools. I’ve only played around with EDD but I plan on exploring other forms of encrypted drive/volume discovery and decryption in the future.